 AGreenNest
Hydroponic Growing
DIY Drip Hydroponic System for Beginners
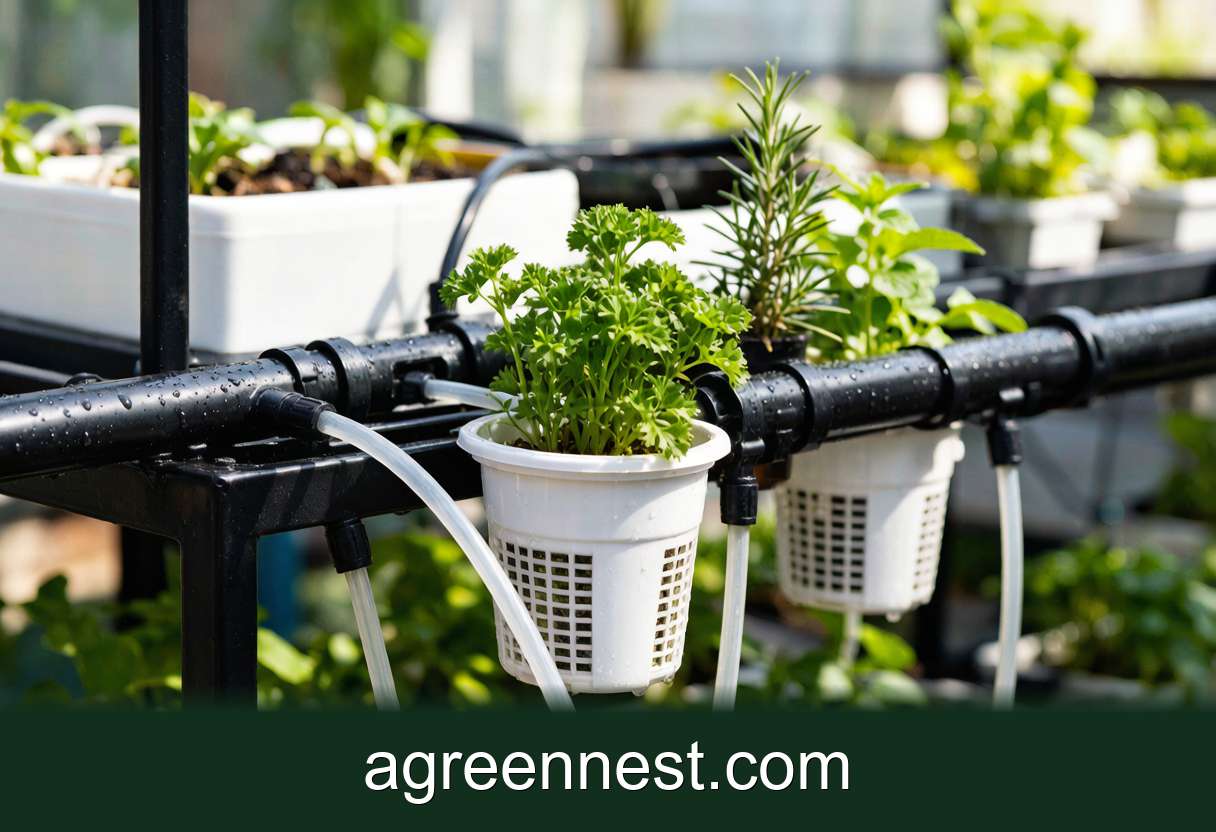
Run DIY Drip Hydroponic System for Beginners at steady strength: 1.5-2.0 EC, pH 5.8-6.2, reservoir 18-22 C. Provide 13-16 hours of grow-light or bright supplemental light for 14-16 hours a day. The only common failure is stale solution, so top up daily and swap the reservoir every 7-14 days so roots stay white and active.
A DIY drip hydroponic system delivers nutrient solution straight to each plant on a timer. It is one of the most forgiving setups for beginners because roots never sit fully submerged and recovery from mistakes is gentle. Most home growers see their first harvest of leafy greens within four to five weeks of assembly.
How a Drip System Works
Drip hydroponics uses a pump to push nutrient solution through small tubes to emitters above each plant. The solution drips onto the grow medium, feeds the roots, and the excess drains back to the reservoir. This recirculating loop keeps plants evenly hydrated without drowning them. Because only the root zone stays moist, oxygen reaches the roots between cycles and growth stays vigorous.
What Parts Do You Need to Build One?
You will need a short, specific list of hardware to get started. Most of it is available at hardware stores or in a complete hydroponic kit. Each component below earns its place, so skip none of them on the first build.
- Reservoir: a 5 to 20 gallon food-grade tub holds the nutrient solution.
- Submersible pump: 120 to 250 GPH suits small home systems.
- Drip emitters: 1 to 2 GPH pressure-compensating emitters per plant.
- Tubing: 1/2 inch main line with 1/4 inch feeder lines.
- Grow medium: coco coir, perlite, or clay pebbles (LECA) in net pots.
- Timer: a digital timer to cycle the pump several times daily.
- Air stone and pump: keeps reservoir oxygen high between feeds.
Quality nutrients matter as much as plumbing. A balanced liquid nutrient set with separate grow and bloom formulas keeps EC and pH easy to manage. Leafy crops such as Lactuca sativa (lettuce) and Ocimum basilicum (basil) thrive on the same base mix at slightly different strengths.
Parts List
The hardware above is the full list for a four to twelve plant bench. Scale the reservoir size up to 30 gallons if you plan to run more than twenty plants from one pump. Pressure-compensating emitters keep every pot at the same flow even when the line runs long. Buy a spare pack of emitters so a clog never stops a plant mid cycle.
Step-by-Step Setup
Start by placing the reservoir below your plant tray so gravity returns drained solution. Drill a drain hole in the tray and route it back into the tub to close the loop. Next, lay the 1/2 inch main tube from the pump across the tray. Connect 1/4 inch feeder lines to each net pot location and cap them with drip emitters pointed at the medium.
Fill net pots with coco coir or clay pebbles and set seedlings in place. Mix nutrient solution to an EC of 1.2 to 2.4 mS/cm for leafy crops, or 2.0 to 3.5 mS/cm for fruiting crops, and set pH to 5.5 to 6.5. Program the timer to run the pump 5 to 10 minutes every 2 to 3 hours during daylight. Add the air stone to the reservoir and confirm the pump refills the tray without overflowing.
How Long Should the Pump Run Each Day?
A good starting schedule is 5 to 10 minutes of pumping every 2 to 3 hours. In hot rooms or with large plants, run closer to 10 minutes and tighten the interval to every 2 hours. Watch the medium between cycles. It should feel lightly moist, not soaking, and never fully dry. Adjust run minutes up or down by a minute at a time rather than big jumps.
Reservoir temperature should stay near 65 to 72°F (18 to 22°C). Warm solution above 75°F (24°C) loses oxygen fast and invites root rot, so shade the tub if needed. Cooler water near 60°F (16°C) slows growth but stays safe for most greens.
Run Times and Tuning
Small changes to the timer produce large effects on yield. Crops in active fruiting demand more frequent cycles than seedlings do. Track the medium weight by lifting the pot; a light pot means the next cycle should run longer. Record EC and pH each morning so you can spot drift before plants show stress.
Pros and Cons
The biggest advantage is reliability. Drip systems tolerate pump failures better than DWC because roots are not fully submerged, buying you time to fix issues. They also scale easily from 4 to 40 plants by adding emitters and a larger reservoir. Maintenance is simple: top off water, check EC, and clean lines monthly.
On the downside, emitters can clog with mineral buildup if you skip filter or maintenance steps. The setup also has more tubing and fittings than a simple Kratky jar, so initial assembly takes an hour or two. Budget an extra 30 minutes per month for line cleaning once the system is running.
Why Does Reservoir Temperature Matter?
Cold or hot nutrient water changes how much oxygen roots can absorb. Target the 65 to 72°F (18 to 22°C) band and your plants will pull food efficiently. A cheap aquarium thermometer clipped to the tub wall gives you the reading without guesswork. Move the reservoir out of direct sun and the temperature will hold steady through summer.
Maintenance Routine
Check EC and pH every 1 to 2 days and top off the reservoir with plain water as plants drink. A full nutrient change every 1 to 2 weeks keeps salt levels balanced. Flush emitter lines with dilute vinegar or a line cleaner monthly to prevent clogs. Inspect roots for white, healthy color and trim any brown mushy sections promptly.
Sanitize the reservoir between crop cycles with a 10% bleach rinse, then rinse twice with clean water. Clean gear now means fewer disease problems later. Swap the solution on a fixed seven to fourteen day calendar so stale mix never lingers.
Frequently Asked Questions
Q: How long should a drip hydroponic pump run?
A: Run the pump 5 to 10 minutes every 2 to 3 hours during the day, lengthening cycles for hot rooms or large plants.
Q: What EC and pH work for a drip system?
A: Use EC 1.2 to 2.4 mS/cm for greens or 2.0 to 3.5 for fruiting plants, with pH held at 5.5 to 6.5.
Q: Can drip emitters clog easily?
A: Yes, mineral buildup can clog emitters, so use a filter and flush lines with a cleaner every month to keep flow steady.
Q: Is a drip system good for beginners?
A: It is very beginner-friendly because roots are not fully submerged, so small mistakes are easy to correct without losing plants.
Q: What reservoir temperature is best?
A: Keep nutrient water near 65 to 72°F (18 to 22°C) so roots stay oxygenated and root rot stays away.
Q: How often should I change the nutrient solution?
A: Fully replace the solution every 1 to 2 weeks and top off with water between changes to keep salt balance stable.
A DIY drip system is a low-stress entry into soil-free gardening that grows with you. Browse more setups and feeding schedules in our beginner hydroponics guide at our beginner hydroponics guide to keep your garden thriving.
Recommended Tools for Hydroponic Growing Care
Free, no-signup helpers matched to this guide.
Free Ebooks to Explore
Downloadable handbooks — no email required.
Free Ebook
The AGreenNest Succulent Care Handbook
The complete, beginner-to-confident guide to growing fat, happy succulents — 10 chapters and a 20-plant directory.
Free Ebook
Haworthia & Haworthiopsis Care Handbook
A focused guide to the striped, forgiving Haworthia clan.
Sources & further reading
GreenNest authors research and write every guide independently. The external links below are reputable references we recommend for deeper reading — they are not the sources we copied from.
- UF/IFAS Gardening Solutions — UF/IFAS
- Michigan State University — Gardening — Michigan State University
- Oregon State University Extension — Oregon State Extension
Share Your Plant Story
Grown something tricky, or found a trick that finally worked? Tell us in the comments, or see what other readers are sharing on our Community page. The best reader tips get folded back into our guides.
Join the Conversation
Have a tip or a question about DIY Drip Hydroponic System for Beginners? Share it below — comments are saved on our server.